Coconut Spongy Dosa
A healthy filling South Indian breakfast- This dosa is super soft, porous and deliciously spongy which is totally melt in mouth. Bet you and your family will love it!
Do you struggle to make crispy thin dosa? Well if do, then this style of dosa is the best for you. This is a soft, spongy, light and gluten-free dosa recipe. Now, no more messy dosas!
Karnataka style coconut dosa (Thengai dosai in Tamil) is a flavorful, yummy dosa variety. It is prepared with rice, poha and coconut as the main ingredients.
This is my child’s favourite breakfast meal. The first time I made this dosa some 3 years back, my child literally gobbled 4 of these. I made extra batter to last me 2-3 days and in those 3 days all he took was coconut dosa in his school lunchbox too. 😄 Even today whenever I make this for breakfast, I see the same excitement on his face.
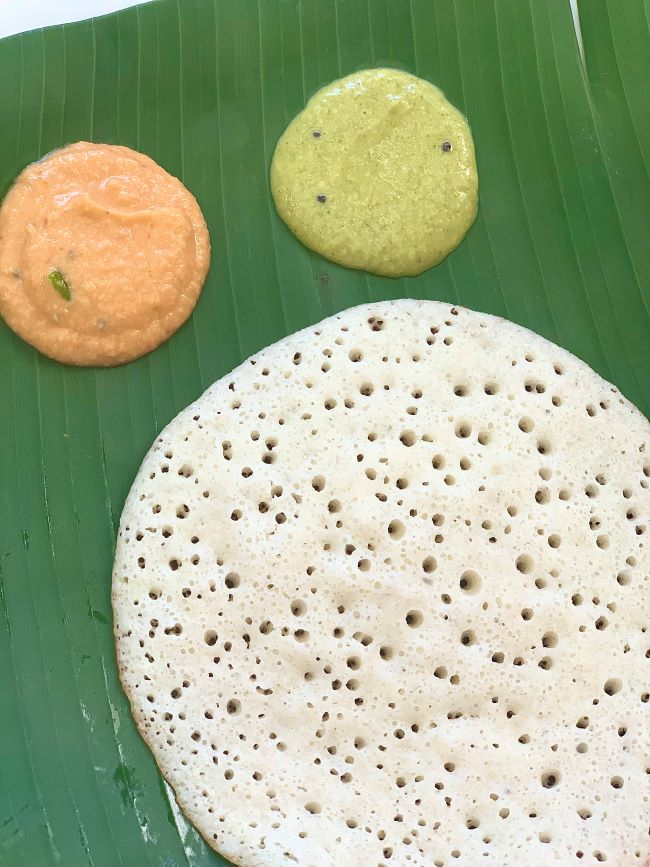
I enjoy this dosa with a spicy chutney- Kara Chutney. You can also serve this delicious Idli Podi (Milagi Podi) as a side with coconut dosa. My child however enjoys it with Coconut Chutney or this Karivepaku Pachadi (Curry Leaves Chutney). These are non spicy yet flavourful chutneys. Perfect for kids.
More About Coconut Dosa
This healthy dosa recipe is so delicious. The texture is spongy, super soft and totally melt in mouth. Coconut adds a very refreshing taste to it and takes the regular dosa to a whole new level. This is a healthy and a filling breakfast dish which takes only minutes to cook. Adding flattened rice, poha as we call it, makes it fluffier and softer than traditional dosas.
Traditionally, this is made without adding urad dal, but I added some to add more protein. You can skip it if you like.
The softness in this dosa comes from natural fermentation. There is no need to add any leavening agents to it.
Importance Of Fermentation
Fermented dosa offers a wealth of nutritional value, thanks to the fermentation process. When the batter undergoes fermentation, all the beneficial micro-organisms convert sugar and carbohydrates from rice and dal to lactic acid. One of the significant benefits of fermentation is the increased bioavailability of nutrients. Also, the final product becomes easy to digest, making it an ideal choice for those with sensitive stomach or digestive issues.
Step by Step Instructions
For detailed recipe, please jump to the recipe card below
For Batter
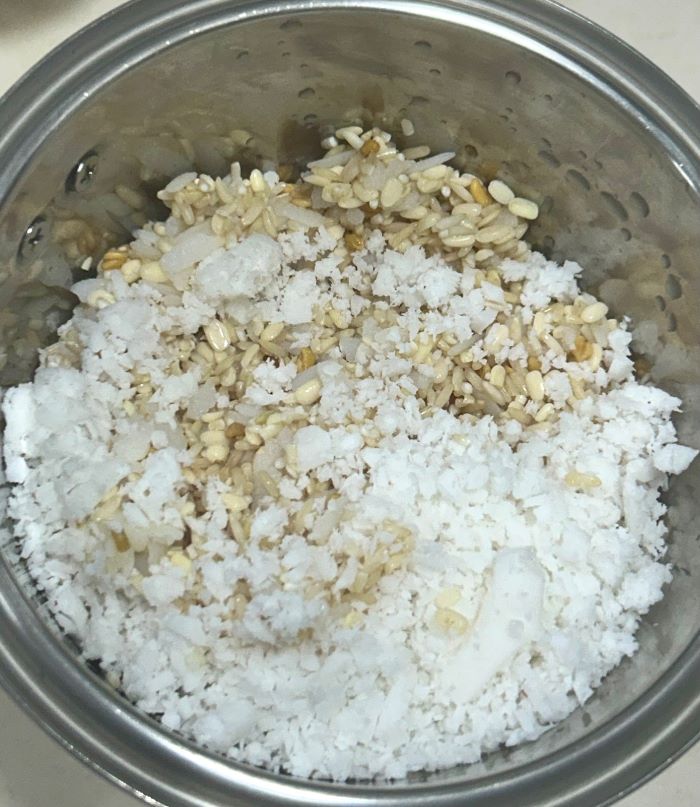
1. Wash and soak raw rice, poha, white split urad dal (optional), fenugreek seeds (methi dana) and poha for 3 to 4 hours. I have used unprocessed indrayani rice for this recipe. You can use idli rice or short grain rice or whichever is easily available. I have even tried this recipe with basmati rice and it works well.
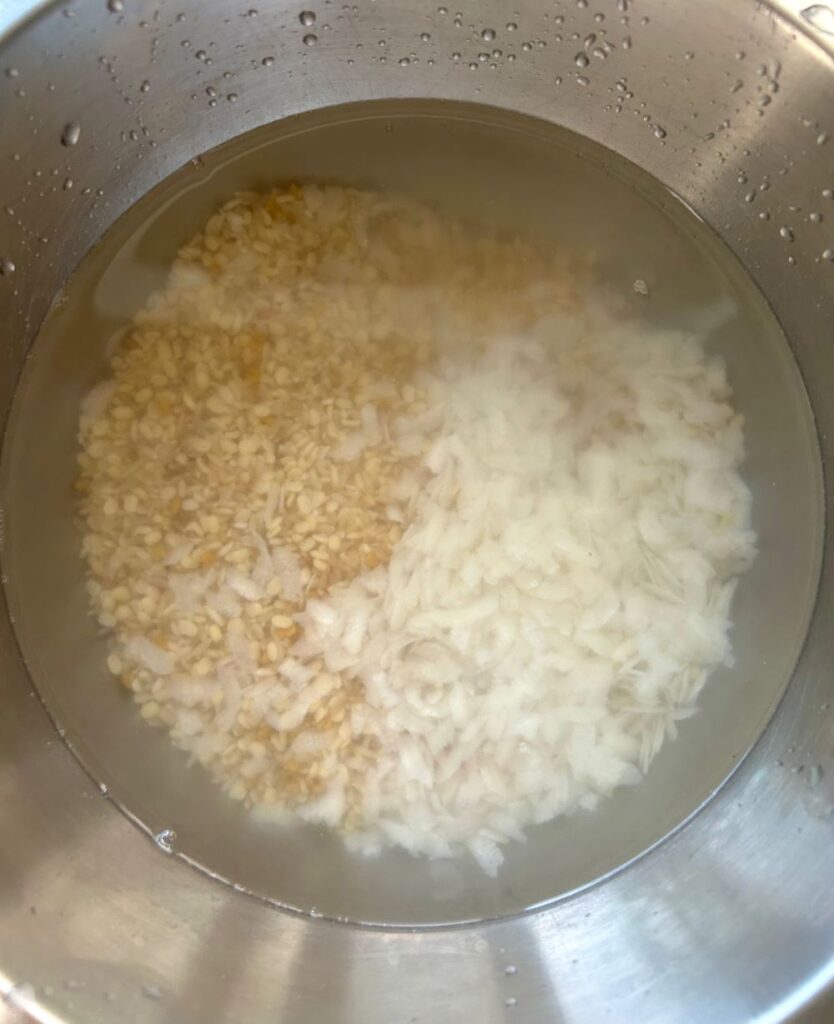
2. Drain all the water after soaking. In a blender jar, add all the soaked ingredients along with grated coconut, water and blend the batter to a smooth consistency.
Note: Add a little water at a time. Do not make too thin or a thick batter. Make sure everything is well combined. Remember the batter will become thinner after fermentation.
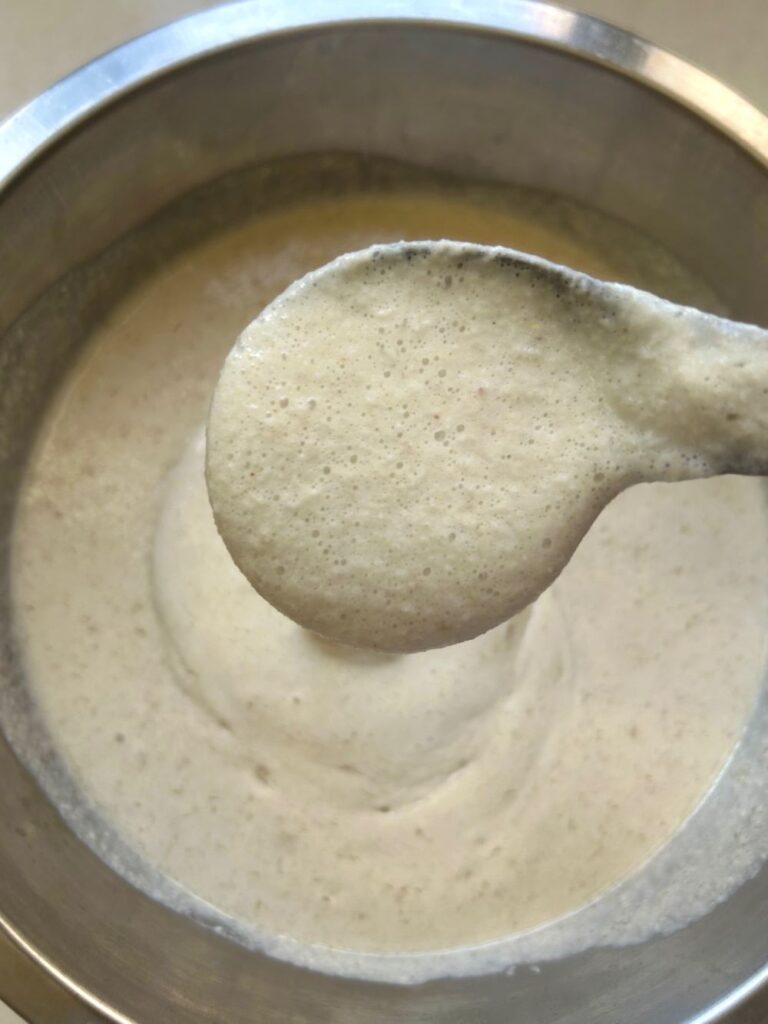
3. Transfer the prepared batter to a large bowl. Make sure there is some room in the bowl because the batter will rise during fermentation. Add a tsp of rock salt and mix well. Cover and leave the batter for fermentation in a warm place for 8 to 9 hours.

Note: Do not add table salt in the batter at this point. Use either rock salt (sendha namak) or Himalayan pink salt. Chemicals in table salt obstruct fermentation.
4. The batter is fermented when you will see the batter has risen and on mixing, the batter forms tiny bubbles. Fermented batter is also much lighter and airy than the non-fermented batter.
Note: Fermentation time will depend on the weather. If it is cold, the batter fermentation might take more than 12 hours. In winters, I add the batter bowl in a preheated oven for warmth. When the weather is hot and humid, fermentation might take less than 8 hours.
5. Add salt to taste. Now you can add regular table salt. Mix it very gently till it is well combined. Do not over mix the batter.
For Cooking
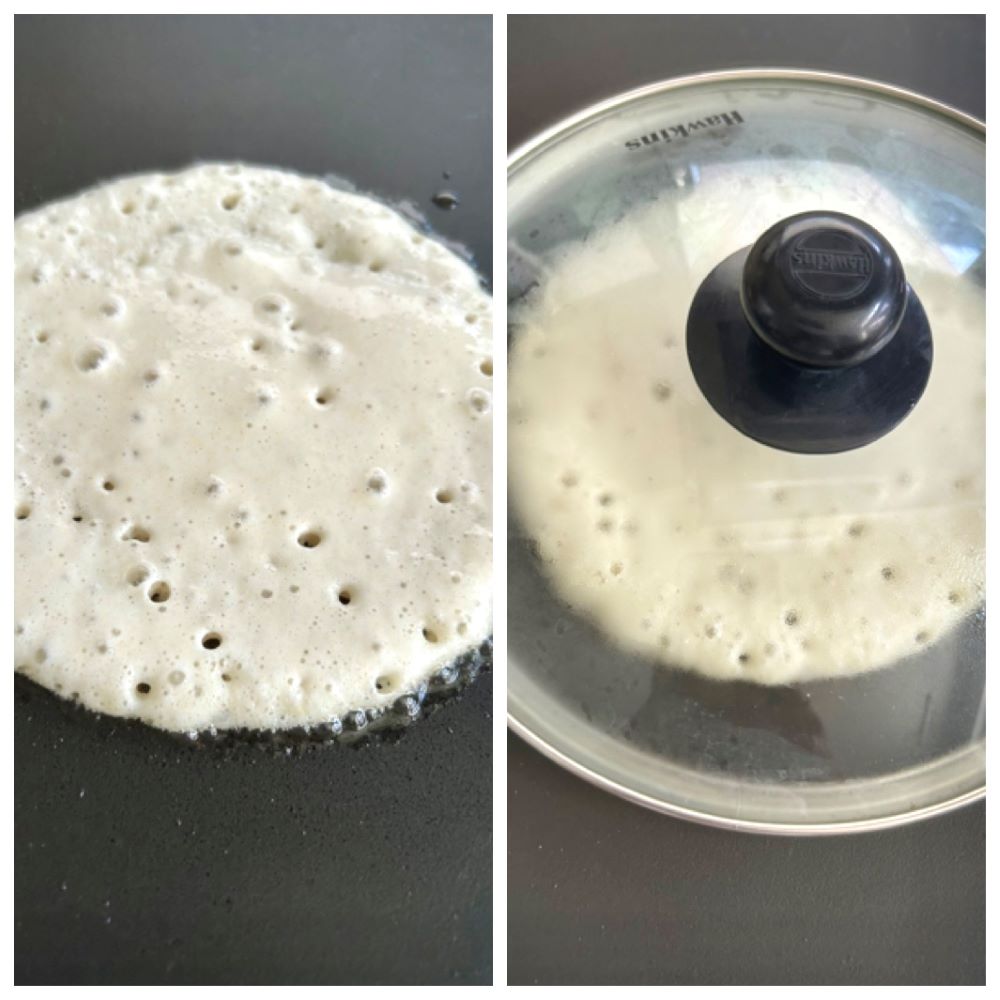
6. Heat dosa tawa on a medium heat. You can use either a non-stick or a cast iron tawa. I have made it on both. They both work well. Add a ladle full of batter. Spread slightly. Drizzle some ghee or oil around the edges and cover it with a lid for 2 to 3 minutes.
Note: If using cast iron tawa make sure it is well seasoned or the dosa will keep sticking to the pan. Incase the tawa is not well seasoned, use a non-stick tawa.
7. Steam the dosa till top has set and the edges have browned. The bottom part of the dosa should be golden brown.
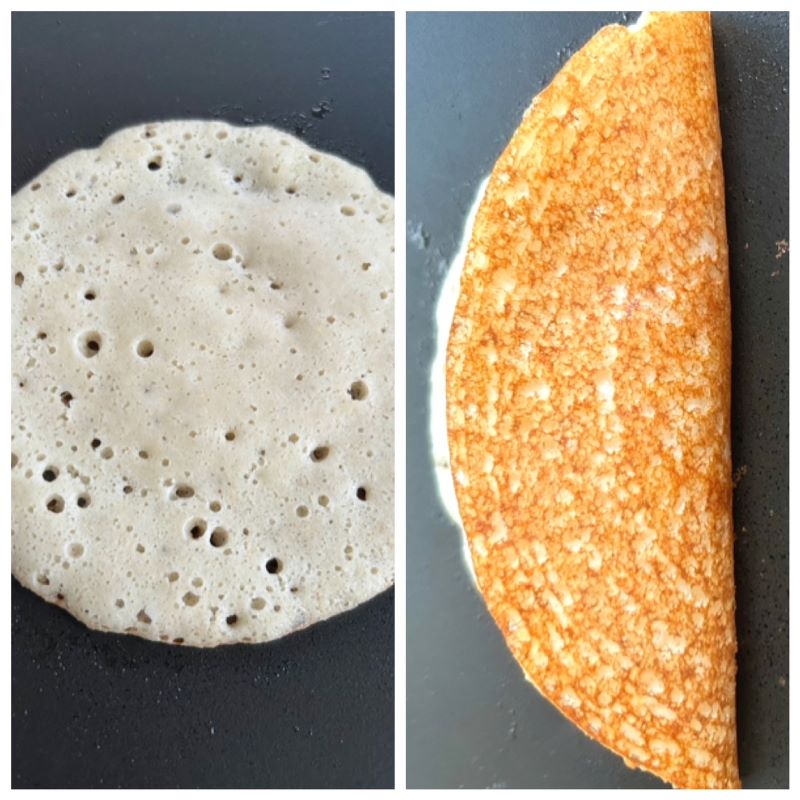
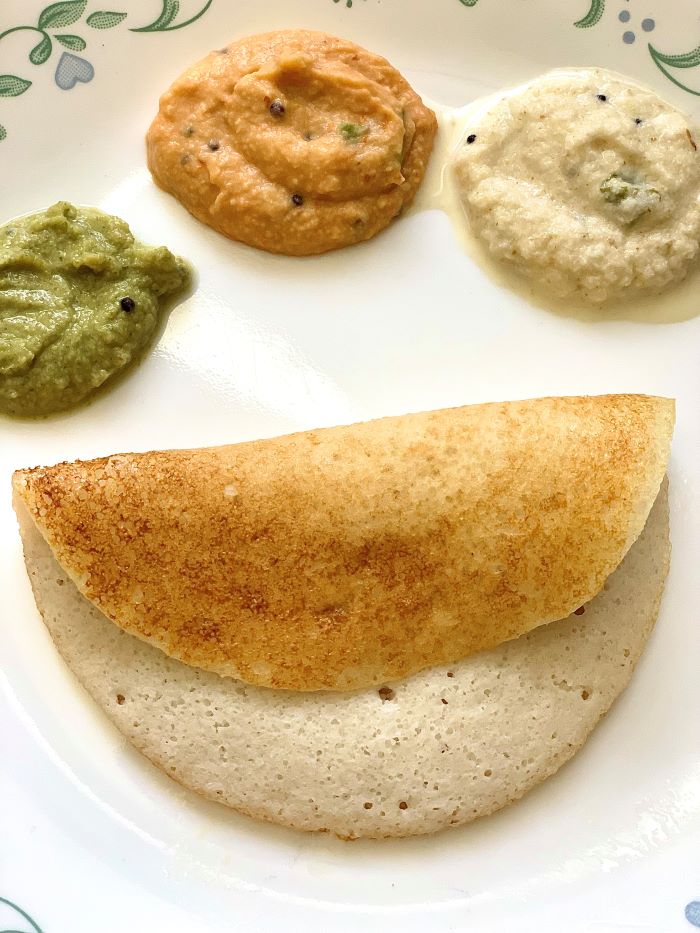
8. Take it out on a plate and serve it with either coconut chutney, kara chutney or curry leaves chutney. You can also serve these with sambar and podi on side.
Fermentation Tips
- Add rock salt to the batter before fermenting. Rock salt or Himalayan pink salt helps in fermentation. Do not use table salt.
- Do not skip fenugreek or methi seeds. It is the main ingredient that helps in fermentation.
- Do not add water in one go. Keep adding little by little to get right batter consistency.
- Mix the final batter with your hands for 2 to 3 minutes and keep it in a warm place. The warmth of your hand will help in fermentation.
- If you stay in a dry or cold place, fermentation may take more than 9 hours. You can place the batter in a pre-heated oven.
Storage
Securely seal the container and store the leftover batter in the refrigerator. The lower temperature will slow down the fermentation process, allowing you to use the batter for several days.
While fresh batter tastes the best, but you can store the batter for 2 to 3 days without compromising on the taste. Beyond that I do not recommend storing the batter.
Freezing idli or dosa batter is not recommended. Freezing will lead to change in the texture and taste. Before using refrigerated batter give it a gentle stir to redistribute the ingredients.

Coconut Dosa Spongy Dosa
Ingredients
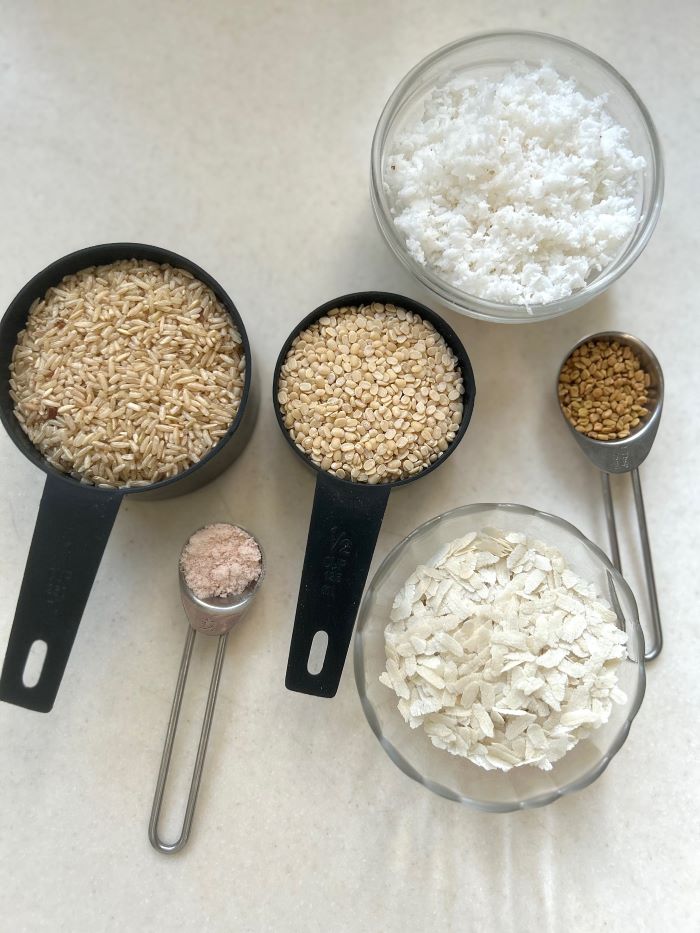
- 1 cup Raw Rice idli rice or any unpolished rice
- 1/2 cup Poha/Flattened Rice
- 1/4 cup White Split Urad Dal
- 3/4 cup Fresh Grated Coconut
- 1 tbsp Methi Dana/Fenugreek Seeds
- 1 tsp Rock Salt/Himalayan Pink Salt
- 300 ml Water (or as required for batter)
- Table Salt to taste
- Oil/Ghee as needed for cooking
Instructions
For Batter
- Wash and soak raw rice, poha, white split urad dal (optional), fenugreek seeds (methi dana) and poha for 3 to 4 hours.
- Drain all the water after soaking. In a blender jar, add all the soaked ingredients along with grated coconut, water and blend the batter to a smooth consistency.
- Transfer the prepared batter to a large bowl. Make sure there is some room in the bowl because the batter will rise during fermentation. Add a tsp of rock salt and mix well. Cover and leave the batter for fermentation in a warm place for 8 to 9 hours.
- The batter is fermented when you will see the batter has risen and on mixing the batter forms tiny bubbles. Fermented batter is also much lighter and airy than the non-fermented batter.
- Add salt to taste. Now you can add regular table salt. Mix it very gently till it is well combined. Do not over mix the batter.
For Cooking
- Heat dosa tawa on a medium heat. Add a ladle full of batter. Spread slightly. Drizzle some ghee or oil around the edges and cover it with a lid for 2 to 3 minutes.
- Steam the dosa till top has set and the edges have browned.
- Take it out on a plate and serve it with either coconut chutney, kara chutney or curry leaves chutney. You can also serve these with sambar and podi on side.
Notes
- Do not add table salt in the batter at this point. Use either rock salt (sendha namak) or Himalayan pink salt. Chemicals in table salt obstruct fermentation.
- Fermentation time will depend on the weather. If it is cold, the batter fermentation might take more than 12 hours. In winters, I add the batter bowl in a preheated oven for warmth. When the weather is hot and humid, fermentation might take less than 8 hours
- Add a little water at a time. Do not make too thin or a thick batter. Make sure everything is well combined.
Give this soft, spongy coconut dosa a try and let me know how it turned out in the comments! I bet you and your family will love every bite—can’t wait to hear what you think! 🥥😊